How to cook Ramen

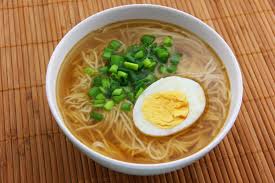
Ramen is an easy, quick-cooking meal perfect for those on the go or college students who are busy studying.

Ingredients

  • 2½ cups (590 milliliters) water
  • 1 packet of ramen, including soup base
  • Toppings, such as eggs, meat, or scallions (optional)

Read also: How to make chutney

Steps

  1. Bring the water to a boil. Pour 2½ cups (590 milliliters) of water into a saucepan. Place the saucepan on the stove and bring the water to a boil over high heat.
  • Stir in the soup base. Tear open the seasoning packet that came with your ramen. Pour the contents into the boiling water and give it a stir.
  • Allow the broth to cook for 1 minute. This ensures that the powder dissolves completely and that the water is hot enough for the next step.
  • Add in the noodles. Gently press down on the noodles with a chopstick or a wooden spoon so that they sink into the water. You may have to hold them down for a little bit. Do not break the noodles in half or stir them. They will separate on their own. You can also cook the noodles separately in a pot of boiling water.
  • Cook the noodles for about 2 minutes. Once they start to break apart, pull them out of the broth using a pair of chopsticks or tongs. You can also pour the broth into a serving bowl through a strainer.
  • Fan the noodles. This will help stop the cooking process and prevent them from turning limp and soggy. You can use a hand-held fan, a little electric fan, or even a stiff piece of paper or a folder. Another alternative would be to rinse the noodles under cold water.
  • Add the noodles back to the broth. At this point, you can add some tasty toppings, such as an egg, meat, or vegetables.
  • Some toppings should be added at the last minute, after you’ve already poured the ramen into a serving bowl.
  • Serve the ramen. Pour the ramen into a large, deep bowl. If you added a pouched or fried egg into the pot, consider scooping it out with a soup ladle, then placing it back on top of the ramen, after it’s already in the bowl. At this point, you can also add other toppings, such as cooked meat.

How to make Fish cakes

These fish cakes are a doddle to make and you can make them from frozen fish and leftover mashed potato.

Preparation time

1-2 hours

Cooking time

10 to 30 mins

Serves

Makes 8-12 cakes

Ingredients

  • 450g/1lb potato, chopped into chunks
  • 450g/1lb mixed frozen fish such as cod, haddock, salmon, smoked haddock
  • 2 tbsp chopped fresh parsley
  • 1 free-range egg, beaten
  • vegetable oil, for frying
  • salt and freshly ground black pepper.

Method

  • Preheat the oven to 190C/170C Fan/Gas 5.
  • For the mashed potato, bring a pot of salted water to the boil. Add the potatoes to the pot and cook until tender, this should take about 15 minutes. When cooked drain in a colander and leave to drain for a few minutes. Return to the pot and mash with a potato masher until a smooth consistency is achieved. Set aside.
  • Put the frozen fish on a roasting tin and cook in the oven for about 10-15 minutes until opaque and starting to flake. When cool enough to handle, remove the skin and any bones and flake the fish into large chunks.
  • Mix the fish, mashed potato, parsley and egg together until well combined. (Mix together carefully so as not to break up the fish too much.) Season with salt and pepper. Shape the mixture into 8-12 patties, depending on how large you want them to be and set aside to chill in the fridge for one hour.
  • Heat vegetable oil in a frying pan and fry the fish cakes until golden brown on each side and heated right through. Serve with tartare sauce and a simple salad

How to make good Mexican tacos

Learn the basics of the real tacos and surprise your family and guests with it. As a note, these are not “Taco Bell” tacos. These are the real thing!

Ingredients

  • Real corn tortillas
  • Beef meat (fillet or some kind of meat you would want to grill)
  • Canned beans
  • An onion
  • Handful of coriander
  • Avocado, turnips (optional, recommended)
  • 1 Persian lime

Steps

  • Buy real tortillas: This is maybe one of the most important things! You will need soft corn tortillas. You can find them in Mexican shops and “Tortillerias”, which is a small Tortilla Factory. You could even make them yourself from dried corn flour if you are willing to “get your hands dirty”. You could also buy a “Instant Corn Masa” Mix.
  • Wash and disinfect the vegetables.
  • Dice the onion.
  • Chop the coriander thoroughly. Make it as small as possible.
  • Grill the meat until you feel it is well done.
  • Cook the beans in a pot. Once done put them in a small plate.
  • While the meat is in the grill, warm the tortillas on a pan just a little, or warm them up in your oven/microwave. Put the tortillas in a plate.
  • Once the meat is done, cut it in small squares, making horizontal and vertical cuts.
  • Put the meat on one the side of the tortilla and cover it with the other side of the tortilla.
  • Cut the lime by half (or quarters if it’s too big) and put it in the plate.
  • Take everything to the table so everyone can add their own onion, coriander, beans and avocado. Once you have all what you want in your taco, put a twist of lime on top.
  • Finished.

How to make Meat pie🍪

A meat pie is a pie with a filling of meat and often other savory ingredients. They are popular in the United Kingdom, Australia, Ghana, Nigeria, Europe, New Zealand, Canada, Zimbabwe and South Africa.

Things You’ll Need

  • Large bowl
  • Rolling pin
  • Large cutting board
  • Paring knife
  • Measuring cup
  • Fork
  • Knife
  • Pie dish
  • Baking sheet
  • Large skillet

Ingredients for the crust

  • 1 1/4 cup all-purpose flour
  • 1/4 tsp. salt
  • 1/3 cup shortening or butter
  • 4 tbsp. cold water
  • Ingredients for the Filling
  • 1 cup chopped potato
  • 1/2 cup chopped onion
  • 3 tbs. margarine or butter
  • 1/3 cup all-purpose flour
  • 1/2 tsp dried thyme or sage, crushed
  • 1 1/4 cup beef broth
  • 1 1/2 cup chopped carrots and peas
  • 2 cups ground beef.

Making the Dough

Make the pie crust.

Mix flour and salt into a large mixing bowl. Stir 1 1/4 cups flour and 1/4 tsp salt together in a large mixing bowl.

Cut the butter or shortening into the flour.

All different methods of cutting the butter into the flour are all equally effective with the right amount of elbow grease.Keep the butter at a cool temperature and begin by cutting large chunks. Keep cutting your chunks down until the butter is mixed in thoroughly. READ ALSO: HOW TO MAKE DOUGHNUT.

Mix cold water into the flour

Pouring cold water one tablespoon at a time into your flour will help you integrate the water gently, allowing the dough to form loosely. The mixture should just barely come together and form a loose ball, and shouldn’t be damp or wet looking.

Be very gentle

The key to a flaky crust is to make sure you don’t overwork the dough. If you overwork the dough, the crust will become tough and difficult to handle.Your mixture will form soft lumps. These lumps should be moist enough that they will hold together if you gently press them between your fingers.

Use your hands to form the dough into a ball.

Very gently, pull the flour into a ball and then split the ball into two equal portions. The recipe should make two portions, one will be the bottom of your pie, and the other will be the top cover.It’s usually a good idea to chill the dough in the refrigerator until you’re ready to roll it out and bake with it. If you’ve already got the oven pre-heated and you’re anxious to get started, putting it in the freezer can be a good way to get the temperature down quickly.

Roll the crust.

On a lightly floured surface, flatten the dough with your hands and roll from the center to the edges with a rolling pin dusted with flour. Aim to form a circle about 12 inches in diameter.

Preparing the filling

Cook your meat.

In a large skillet over medium heat, add 2 cups ground beef and 1/2 cup chopped onions. Season with thyme, cloves, chopped garlic (if desired) and salt.Cook over medium heat, stirring to crumble the meat and mix in the spices, until the meat is evenly browned.If you’d like a more flavourful pie, you can also use a dash of cinnamon and nutmeg as seasoning.

Discard the grease or fat.

Once your meat is cooked through, use a wooden spoon or spatula to push your meat to one side of the pan and tilt the pan away, letting the grease pool on the other side. Spoon it grease out, or carefully tilt your pan over a grease safe container to dispose of it.Do not dump grease into the kitchen sink or toilet bowl or even use hot water to wash it down the drain. This allows grease to get into the sewage system or harden in your pipes.

READ ALSO:HOW TO MAKE APPLE PIE

Add the vegetables and beef broth.

Chop 1 potato into small pieces and add it to the skillet with 1 1/4 cup beef broth to start. Pour in 1 1/2 cup carrots and peas. The beef broth will keep your filling moist once the grease has been drained out.

You can peel your potato if desired.

If you want something different, try using a sweet potato instead.
You can also add more or less beef broth as needed, but don’t let your filling get too soupy.

Making your pie

Making a whole pie

Preheat the oven to 350 degrees F.

Assemble a whole pie.

Roll your pie crust around the rolling pin. Start from one edge and carefully wrap your crust around the pin. Transfer your crust to your pie dish by carefully unrolling it from your pin and laying it down into the dish. Avoid stretching the pastry.

Trim the crust.

Trim to about 1/2 inch beyond the edge of the pie plate and fold the extra pastry under to create a thicker crust on the rim.

Fill your pie.

To assemble your pie, slowly pour the filling into the pastry-lined pie dish. Level it off and don’t overfill your dish.

Cover your pie.

Roll out an additional circle of dough or pastry and carefully place it over your pie. Pinch the edges of the bottom layer and top layer of dough together and create the knuckle-like pie edge ridges. Trim off any excess using a sharp knife.

Make a few slits in the top.

Use a sharp knife to cut some vents into the top crust to allow the steam to escape when cooking.
Brush the top of your crust with egg or melted butter. This will help keep the crust moist and prevent cracking.

Bake your whole pie.

Place your pie onto an oven rack in the center of your oven and cook for about 45 minutes or until the top of the pie is golden brown.

Making individual pies

Cut your dough.

Roll out your dough and cut it into 6 even pieces, about 5 ounces each.Roll the pieces into 6 individual balls. Dust your workstation with flour to prevent dough from sticking.

Roll out your dough.

Roll your pieces into about 8-inch flat circles. If your dough is very warm, it may be difficult to handle, cool it in the refrigerator for about 5-10 minutes if necessary.

Fill your individual pies.

Evenly divide your filling into about 3/4 cup per individual pie and scoop it onto half of each dough circle. Carefully fold the dough over to cover the filling and use your fingers or a fork to press the edges together.

Slice slits into the tops of each pocket.

Use a sharp knife to cut a few slits into the top of your pies. This allows steam to escape when baking and helps to prevent the pie from cracking or bursting in the oven.Brush the top of your pockets with egg or melted butter to keep the top moist.

Bake your pies.

Bake your pies on a lightly oiled or non-stick baking sheet in the oven for about 45 minutes to 1 hour or until the crust is golden brown and flakey.

How to Make doughnuts

Doughnuts come in all shapes and sizes. They are the perfect way to treat yourself on a lazy weekend, or to indulge in a baking adventure. Store-bought doughnuts are great, but homemade ones are even better. Enjoy!

Prep time (Fried Glazed): 2 hours, 30 minutes
Cook time: 15 minutes
Total time: 2 hours, 45 minutes

Ingredients
Ingredients for Fried Glazed Doughnuts
2 (.25 ounce) envelopes active dry yeast
¼ cup warm water (105-115°F or 40-45℃)
1½ cups lukewarm milk
½ cup white sugar
1 teaspoon salt
2 eggs
⅓ cup shortening
5 cups all-purpose flour
1 quart (1 liter) vegetable oil for frying

For glaze:

⅓ cup butter
2 cups confectioner’s sugar
1½ teaspoons vanilla
4 tablespoons hot water or as needed
Ingredients for Baked Glazed Doughnuts
2 cups all-purpose flour
¾ cup white sugar
2 teaspoons baking powder
¼ teaspoon ground nutmeg
¼ teaspoon ground cinnamon
1 teaspoon salt
¾ cup milk
2 eggs, beaten
1 teaspoon vanilla extract
1 tablespoon shortening (or 2 tablespoons melted butter)

For glaze:

1 cup confectioner’s sugar
2 tablespoons hot water
½ teaspoon almond extract
Ingredients for Canadian Fried Dough
½ cup warm water (110° F or 45° C)
5 teaspoons active dry yeast
1 pinch white sugar
1 cup warm milk (110° F or 45° C)
⅓ cup white sugar
1½ teaspoons salt
1 teaspoon vanilla extract
3 beaten eggs
⅓ cup vegetable oil
5 cups whole-wheat flour, divided
1 quart vegetable oil for frying

For dusting:

2 cups white sugar
½ teaspoon ground cinnamon, or to taste

Fried Glazed Doughnuts

Mix the yeast and the warm water together in a small ramekin. The yeast needs warm water to activate; it will help the doughnut dough rise and stay fluffy. Let activate for 5 minutes.

Mix yeast mixture, milk, sugar, salt, eggs, shortening, and 2 cups of the flour in a mixer on a low speed.

Alternatively, you can use a wooden spoon and mix by hand, but be sure to mix the dry ingredients first, then the wet ingredients separately, and then combine the two.

Beat in remaining flour, ½ cup at a time, at a low speed.

Do this until the dough no longer sticks to the bowl.

Knead the dough with your hands and knuckles for 5 minutes until the dough is smooth but elastic.

Set the dough into a greased bowl to rise.

Cover with a towel and let stand until dough doubles in volume (about 1 hour). Dough will be ready when you can press a finger into it and the indentation stays.

On a floured surface, roll the dough out until it’s about 0.5 inch (1.3 cm) thick.

Cut with a floured doughnut cutter, or cut into doughnut shapes by hand.

Let the doughnuts rise again until double their size (about 30-60 minutes).

Lay them out on a tray and cover them with a large, clean towel.

Prepare the glaze while doughnuts are rising.

This is a classic butter glaze, not unlike the Krispy Kreme glaze that is popular in America.

To make the glaze:

  • Melt butter in a saucepan over medium heat. Be careful not to burn the butter.
  • Take the butter off the iron and stir in confectioners’ sugar and vanilla until smooth.
  • Stir in hot water one tablespoon at a time until the icing is thin, but not watery.

Heat the oil in a deep fryer or skillet until oil reaches a temperature of 350℉ (175℃).

Use a kitchen thermometer for maximum precision.
To avoid a greasy taste, heat the oil up on medium high for five minutes, and then gently reduce the heat until thermometer reads 350℉ (175℃).

Slide the donuts into the oil carefully, with metal tongs or a spatula.

Turn the doughnuts over when they float up to the surface. Fry evenly on both sides until golden brown.

Remove doughnuts from oil and let drain on a wire rack.

Make sure any excess oil drips off the doughnut before you glaze it.

While doughnuts are still warm, dip doughnuts into the glaze, coating evenly.

Set to dry on a wire rack and enjoy immediately

How to reduce fat through the foods we eat

Avoid added sugars and artificial sweeteners.
They can increase cravings and lead to overeating. There are over 60 names for added sugars, so it can sometimes be a challenge to identify them in an ingredient list. Some examples of added sugars are:

  • Agave nectar
  • Barley malt
  • Cane juice
  • Corn syrup
  • Dextrose

Opt for meals that are low-calorie.

Low-calorie diets will help you lose weight and reduce body fat. Monitor how many calories you eat daily and reduce this number by around 500 calories each day. This will yield a 1 – 2 pound weight loss per week.

Count how many calories you’re currently consuming. You can use a food journal, app or online calculator to help you do this accurately. Cut out about 500 calories from this number. Your end result should be what you aim for daily for slow and safe body fat loss.

Do not try to follow a very low calorie diet or consume less than 1,200 calories daily. When you’re calories are too low, you may stop losing weight or lose lean muscle mass, not body fat.

You may want to check with your physician or dietitian about the amount of calories you should be consuming in order to reduce body fat.

Focus on lean protein.

Protein is essential for your body’s metabolism. Focusing on lean protein at all meals and snacks can help support weight loss and body fat reduction.
Lean protein should be included at all meals. This will help ensure you meet your daily recommended amount.

Women should aim for 46 g daily and men should aim for 56 g.
Lean protein sources include: poultry, lean beef, pork, legumes, tofu, low-fat dairy and seafood.
Limit or avoid sources of protein that contain higher amounts of saturated fat. Some studies have shown that a diet rich in saturated fats may increase body fat especially in your abdomen.

Limit foods like:

  • full-fat dairy
  • fatty cuts of meat
  • butter.

Make fruits and vegetables a priority in meals.

In addition to lean protein, make a large part of your meals and snacks vegetables. You will also want to eat plenty of fruit. These foods are very nutritious and contain a lot of healthy nutrients your body needs.
It’s generally recommended to consume about five to nine servings of fruits and vegetables each day. Aim for one to two servings of fruit and the rest should be vegetables.

Also, when you’re choosing foods from these groups, try to choose items that are brightly colored or darkly colored.

These foods are typically more nutrient-dense meaning they contain higher amounts of vitamins, minerals and antioxidants.

For example, choose kale over iceberg lettuce.

Reduce the amount of grains you eat.

One of the best ways to reduce your body fat is to reduce the amount of grains you eat each day. These carbohydrate-rich foods can slow the reduction of body fat.

How to make meat Samosa

Samosas are a commonly eaten savory snack in India, Bangladesh, Pakistan and Sri Lanka. The filling usually consists of spiced potatoes, onion, peas, coriander, lentils, and cauliflower, but sometimes includes minced meat or fish. Creating this delicious finger food is easy to do in your own kitchen!

Ingredients

  • 500 g minced meat (lamb, beef, chicken)
  • 4 tbsp oil, for frying the meat
  • 1 tsp salt, or according to taste
  • ½ tsp chili powder
  • 1 tsp ground coriander
  • 1 tsp ground cumin
  • 1 tsp garam masala powder
  • 1 tsp turmeric powder
  • 1 ½ medium onions, peeled and finely chopped
  • 1 small bunch fresh coriander leaves, chopped
  • 1 medium beaten egg, for sealing samosa pastry
  • 1 packet samosa pads or filo pastry
  • 2 tomatoes, chopped
  • 125 g frozen peas

Making the Filling

Heat the oil.

In a large frying pan, heat the 4 tbsp of oil.

Fry the onions.

Over a medium heat, stir fry the onions for about 1 minute. Now add the spices and chilis and fry until onions are golden brown.

Add the meat.

Now add the minced meat and fry it until it is browned. Stir for a few more minutes and add peas.

Cook the meat.

Cover and cook on a low heat for 20 minutes until the meat is cooked (tender). Add oil if the pan seems to be too dry and make sure you stir it occasionally. Add salt if necessary.

Turn off the heat and let the mixture cool .

Making Samosa Cones

Preparing the cone .

Take a sheet of the ready made samosa pad or 2 sheets of Filo pastry and make a triangle cone by folding the edges around themselves and sealing the edges with the beaten egg using a pastry brush. Make sure to leave one side open to add the filling.

Fill it with meat mixture.

Now fill the samosa cone with minced meat. Lift and pinch the corners together and continue along the seam towards the corner. View the video to see how this is done.

Cover the finished samosas with a moist cloth as you continue to make more.

Deep fry the samosa gently until it they are golden in colour on each of their sides.

Do not fry them fast as it may make them stiff .

Serve hot with a ketchup and enjoy with your family and friends.

How to Make Zobo Drink

West Africa is a region with many delicious foods and drinks, a favorite across many countries is a drink called Zobo (also known as Solobo or Bissap). If you have ever wanted to try something from a different culture or if you are a foodie looking for new recipes, this tasty drink is a great place to start because it is quick and very easy to make.

Choose your hibiscus leaves.

Get dried hibiscus leaves (sorrel or roselle) from your local supermarket or African/Caribbean market. Make sure you get red sorrel not white sorrel for this drink.

Choose a pineapple.
When looking for a pineapple at the store make sure to get a ripe pineapple, the skin should be more yellow and orange than green, this will result in a better flavored drink.
Choose a sweetener.
You can use any sweetener you want to make this drink for example Agave Nectar, Cane syrup, cane sugar etc. You can make this drink without a sweetener for a sugar free, low-calorie alternative.

Pick appropriate sized pot.

Choose a pot depending on the amount of the drink you want to make. for a small amount of Zobo for 2-4 people you can use a saucepan, for a larger quantity you can use a bigger pot.
Remove pineapple skin.

Cut off the the crown of the pineapple. Cut off the base, then cut the pineapple in half to make it easier to work with.
Cut vertically down around the perimeter of the pineapple to get rid of the skin.

Dice the pineapple.

Working on one half of the pineapple at a time, cut that half piece in half again then cut each of the two new pieces into medium sized chunks

Add ingredients into a pot.

Pour the sorrel leaves into a pot, fill it up half way then add the pineapple chunks, finally add just enough water to cover the leaves.

Let the mixture boil.
Let it boil for approximately 30 mins, turn off the heat when the mixture begins to bubble over, you should notice the dark purple-red color of the drink at this point. Let the drink cool down to room temperature, this should take approximately another 30 minutes.
Drain the juice.

Drain the juice through a sieve, colander, cheese cloth or anything you have that can separate the liquid from the solid parts.

Wring out any remaining juices in the sorrel and one pineapple mixture with you hand (use a glove)

Add sweetener and refrigerate.

Add your sweetener of choice (optional), stir the mixture well and refrigerate it if you desire a cold drink. Enjoy

How to make Pretzel

For a pretzel fan, there’s nothing better than baking these treats fresh at home. Pretzels are first boiled, then finished in the oven to achieve the classic taste and texture. Learn how to make either big soft pretzels or crunchy snack pretzels in your own kitchen.

  • 1 cup water, warm
  • 3 1/4 of cups of all purpose flour
  • 1 teaspoon sugar
  • 1 teaspoon salt
  • 1 teaspoon active dry yeast
  • 1 ounce unsalted butter, melted
  • 1 teaspoon vegetable oil
  • 1/2 cup baking soda
  • 8 more cups of water
  • 1 egg yolk
  • Pretzel salt

MAKING THE DOUGH

Proof the yeast.

Place the warm water, sugar, and 1 teaspoon of salt in a mixing bowl. Stir the mixture until the sugar and salt are dissolved, then sprinkle the yeast over the liquid. Stir gently, then allow the mixture to sit for about 10 minutes, or until the yeast starts to foam and produce little bubbles.

Add the flour and the butter.

Sprinkle the flour evenly over the mixture, rather than dumping it all in one place, as it will be easier to mix this way.

Mix the dough.

Using the dough attachment on the mixer set to the lowest speed, or a wooden spoon and your own elbow grease, mix the dough until it is completely combined.

Knead the dough.

If you’re using a stand mixer with a dough hook attachment, change the speed to medium and let it work the dough until you can see clearly that it pulls away from the bowl. Otherwise, knead the dough by hand for about 10 minutes, until it’s no longer sticky and forms a smooth, elastic ball.
If the mixture is still gooey and does not pull away from the bowl, add a tablespoon of flour at time and keep stirring until the consistency is right.

Let the dough rise.

Grease a large bowl with the oil and put the dough in it. Cover it with plastic wrap and let it sit somewhere warm for an hour or two, until the dough has doubled in size.

ROLLING AND SHAPING THE PRETZELS

Roll the dough.

Grease a work surface with some oil and place the dough on it. Grease your hands as well. Set the dough on the work surface and roll it with your hands to form a thick rope Roll the dough into a think rope about the length of your forearm (the length from the tip of your middle finger to your elbow). Divide it into 8 more or less equal size pieces.

Shape the pretzels.

To make the classic pretzel shape, arrange a length of dough in a u-shape. Cross the ends and press them into the two sides of the U. You can also break up the dough into smaller pieces and create mini pretzels, spears, or other fun shapes.
Make sure the ends are securely pressed or they will loosen later when you drop them in the boiling water.
If you’re making hard pretzels, break the dough into about 24 pieces and create smaller shapes, like rods or twists.

BOILING AND BAKING THE PRETZEL

Heat the oven.

If you’re making soft pretzels, preheat the oven to 450 degrees. For hard pretzels, you need only heat it to 350 degrees.

Prepare the water bath.

Mix the 8 cups of water and the baking soda in a shallow pan. Bring the water to a boil and then turn the heat off.

Boil the pretzels.

While the water is still boiling, drop each pretzel carefully, one by one, into the boiling water for around 30 seconds (counting). Place them back on a greased baking sheet.

Brush the pretzels with egg wash.

Mix the egg yolk with 1 tablespoon of water and brush each pretzel with this mixture.

Sprinkle each pretzel with pretzel salt.

Bake the pretzels.

Soft pretzels should be placed in the oven for about 12 minutes, or until they’re golden brown. Hard pretzels are cooked for 50 minutes at a lower temperature. Check on them every 15 minutes to make sure they aren’t burning.

Remove the pretzels from the oven and let them cool.

Place them on a cooling rack or a clean plate. Let them cool for about 10 minutes or until they’re no longer piping hot to the touch. Serve with mustard or cheese sauce, or enjoy plain.

How to make Pancakes

Pancakes are a traditional breakfast treat that are easy to make. Once you get the basic recipe down, you can start experimenting and putting your own spin on these breakfast-time favorites.

Ingredients
The following ingredients will make about 8-10 inch (25 cm) pancakes (more or fewer, depending on the size); you may change the amounts of ingredients according to the number you wish to serve:

2 cups (18oz/510g) self-rising or all-purpose flour (See tips below)
2 or 3 eggs
1 1/2 cups (350ml) of milk
1/2 teaspoon of baking soda
2 tablespoons of butter or vegetable oil
5 tablespoons of sugar
1/2 teaspoon of vanilla extract (optional)
A pinch of salt.

Italian Lasagna with Creamy Bechamel Sauce

  • 5 tablespoons unsalted butter
  • 1/2 cup all-purpose flour
  • 4 cups whole milk (room temperature)
  • Freshly grated nutmeg
  • 1 1/2 cups tomato sauce
  • 1/4 cup extra-virgin olive oil
  • 1 pound ground chuck beef
  • 3 large eggs
  • 1 pound lasagna sheets, cooked al dente (see Tips section for details)
  • 2 (10-ounce) packages frozen chopped spinach, thawed and squeezed dry
  • 3 cups shredded mozzarella
  • 1/4 cup freshly grated parmesan cheese
  • Salt and pepper

Servings: 6

Total Time: 1 hour and 15 minutes

Preheat the oven to 375 degrees Fahrenheit (190 degrees Celsius).

Prepare the Bechamel sauce.

In a large pot, melt the butter completely over medium heat. Add in the flour and whisk until smooth. Gradually add in the milk, continuing to whisk and simmer over medium heat for about 10 minutes.
The sauce should be thick, smooth, and creamy when finished. Set aside and allow to cool completely.

Heat extra-virgin olive oil in a sauté pan and then add the ground beef.

Season with salt and pepper and cook the meat until it is browned. Drain the excess fat and set aside, allowing to cool completely.

In a medium-sized bowl, whisk the eggs.

Add in the ricotta cheese, salt, and pepper and then mix thoroughly.

Spread an even layer of the Bechamel sauce (about 1/3 of it) into the bottom of a baking dish.

Cover it with one layer of pasta, overlapping the pasta slightly to make sure the entire dish is covered.

Cover with one layer of the ricotta mixture.

Follow with one layer of spinach, and then add another layer of pasta sheets.

Add all of the ground beef in an even layer.

Cover it with 1.5 cups of mozzarella cheese.

Spread another 1/3 of the Bechamel sauce over the mozzarella.

Arrange another layer of pasta on top, and then spread the remaining bechamel sauce over it. Sprinkle with the remaining mozzarella and Parmesan cheeses.

Cover the lasagna with aluminum foil and bake for about 30 minutes.

Remove the cover and bake for an additional 15 minutes.

Allow to cool before serving. Enjoy with a glass of red wine if you are old enough.

Basic Lasagna with Meat

Lasagna is a traditional Italian dish comprised of overlapping layers of pasta, cheese, meat, and tomato-based sauce. This article will walk you through takes on this popular dish that will be finished and ready to eat in under two hours!

Basic Lasagna with Meat

  • 1/2 pound lean ground beef
  • 1/2 pound Italian sausage, casing removed
  • 4 cups spaghetti sauce
  • 2 eggs
  • 2 (15-ounce) containers ricotta cheese
  • 2 cups shredded mozzarella cheese
  • 1 teaspoon garlic powder
  • 1 teaspoon dried parsley flakes
  • 1/2 teaspoon salt
  • 1/4 teaspoon ground black pepper
  • 9 uncooked lasagna noodles
  • 1/4 cup grated Parmesan cheese

Servings: 12
Total Time: 1 hour and 30 minutes

Preheat the oven to 350 degrees Fahrenheit (176 degrees Celsius).

In a large skillet, add the ground beef and sausage and cook on medium heat until lightly browned.
Drain most of the fat from the pan, leaving some behind for flavor.

Stir in four cups of the spaghetti sauce.

In a large bowl, beat the eggs and then add the ricotta cheese, 1 1/2 cups of mozzarella cheese, garlic powder, parsley, salt, and pepper.

Mix all of the ingredients together.
Set the remaining mozzarella cheese aside for later.

Add one cup of the meat sauce to the bottom of a baking dish.

Spread the mixture out evenly to form a smooth layer. Cover the meat sauce with one layer of uncooked noodles (about 3).

Spread half of the cheese mixture over the noodles.

Make sure to form an even layer that covers the entire dish.

Repeat the process with another layer of meat sauce, noodles, and cheese.

Then add an additional layer of noodles and top it with the remaining meat sauce.

Sprinkle the remaining mozzarella and parmesan cheese over the meat sauce.

Cover with aluminum foil and bake in the oven for 45 minutes.

Remove the dish from the oven and take off the foil.

Bake uncovered for an additional 15 minutes, or until the noodles are tender.
Let the lasagna stand for 15 minutes before serving.

How To Make Homemade Vanilla Icecream

Nothing beats the smooth, creamy delight of homemade vanilla ice cream, served solo or accompanying a delicious dessert.

Whether you own an ice cream maker or not, everyone should have the perfect homemade vanilla ice cream recipe in their repertoire. All you need is the best quality ingredients you can find and a little patience. You may never eat store-bought vanilla ice cream again!

Ingredients

  • 1 cup whole milk
  • 3/4 cup sugar
  • 1 vanilla bean, split lengthwise
  • 2 cups heavy cream
  • 5 large egg yolks
  • 1 teaspoon pure vanilla extract
  • A pinch of salt

Using an Ice Cream Maker
In a medium saucepan, heat up the milk, sugar and salt. On a chopping board, use a paring knife to scrape the seeds from the vanilla bean carefully. Add these seeds to the milk, with the scraped bean pod. Take the saucepan off the heat, cover with a lid, and allow infusing for at least an hour.

You can tell if a vanilla bean is good quality by smelling it. You should be able to smell the vanilla. Don’t be fooled by the plumpness of the bean — a plump bean doesn’t automatically equal more flavor, it may just have a high water content.

If the bean smells smoky, this means the bean was not left to dry out properly, rather it was quickly flash dried over a fire. If this is the case, the vanilla beans are probably not of a high quality.

Chill the cream.

Next, you will need to chill the heavy cream in an ice bath. You can make an ice bath by filling a large bowl halfway with icy water. Place a smaller bowl into the water, into which you will strain the cream. Let the heavy cream sit in the ice bowl until cooled.

Make the custard.

In a large, clean bowl, whisk the egg yolks until combined. Take the vanilla-infused milk mixture and warm it up again. Once it is warm, gradually stir it into the bowl with the egg yolks, adding a little at a time and whisking constantly to combine. Once all the milk has been combined with the yolks, pour this mixture back into the saucepan.

Place the saucepan on a low heat and stir the custard constantly.

Make sure to scrape the bottom of the saucepan with a spoon or spatula to prevent any of the mixture from sticking. When the custard forms a light coat on the back of the spoon or spatula, it is ready.
Depending on how rich you want your custard to be, you can add up to three more egg yolks.

Combine the custard with the heavy cream.

Pour the custard mixture through the strainer, into the heavy cream in the ice bath. Remove the strainer and stir to combine. When the mixture has cooled fully, add in the vanilla extract, cover the bowl, and place in the refrigerator. Leave for several hours or overnight, if possible.

There are three main types of vanilla extract: Bourbon, Tahitian and Mexican. Each has a slightly different flavor. Bourbon vanilla is from Madagascar and has a strong, bold flavor; Tahitian vanilla is floral, while real Mexican vanilla is creamy-tasting, with a pronounced flavor.

Always use a vanilla essence with an alcohol base.

The alcohol, even if burned off during cooking, enhances the flavor of the vanilla extract.
For a lighter custard, you can replace the heavy cream with half-and-half. Just be aware that your ice cream will turn out less smooth as a result.

Removes the ice cream custard from the refrigerator.

Remove the vanilla bean and spoon the mixture into your ice cream maker. From this point, you can follow the manufacturer’s instructions to find out how to freeze the ice cream mixture in your particular machine.

Serve or store.

Serve your homemade vanilla ice cream straight from the ice cream maker or store in an airtight container in the freezer to create a firmer ice cream.

Vanilla ice cream is the perfect accompaniment to homemade fruit pies and warm chocolate cakes.

It also makes a delicious dessert served on its own, covered in chocolate or caramel sauce and toasted pecans or almonds.

How to Get Children to Eat Healthy

Of course, every child loves to take a bite out of a fatty hamburger and chug a bottle of root beer. However, if a child is constantly eating like this, serious health risks could become a reality. To get your child to eat healthy foods, there are certain steps you must follow.

Figure out the reason why he does not want to eat fruits, vegetables, or other healthy food. He may not like the taste of them, or simply prefer to eat unhealthy foods such as fast-foods

Show children what is in processed foods.

If they know how much sugar and fat they are consuming, they will be less likely to want to continue eating it. Teach them to read ingredients’ lists and recognize the unhealthy and disgusting components. However, if the children are very young, they may need your help explaining what all of the nutrition facts mean.

Get them involved.

If you force your child to eat healthy at home when they really don’t want to, they aren’t going to continue these healthy eating habits at school or at a friend’s house. It’s important to make children want to eat healthy instead of forcing it upon them.

Let them pick out foods from the vegetable and fruit section.

If children pick up the types of healthy foods they like to eat, then they will be more wanting to eat them. You could also try purchasing “fun” fruits and vegetables, such as a banana with a face on it or an apple with a sticker. Children actually love to eat foods that look fun and exciting.

Make homemade foods with the children.

Whenever you buy products from a store, they contain a lot of processed junk that makes the food extremely unhealthy.

Also, when you take your child out to eat at a fast-food restaurant, they are eating a lot of hidden fat and sugar that you probably didn’t even know was there. Try making your own peanut butter with the children. Not only will they be eating more healthy, but they will also get to spend quality time with you and learn a new skill.

Teach them how to cook simple meals.

If children learn how to cook fun foods on their own, they will be more than thrilled to eat their own creations. This can be beneficial because soon enough, your children will want to make their own food instead of begging you to take them out to a fast-food restaurant. You will save a lot of money by spending a few extra minutes to help them make a meal.

Children can make breaded chicken cutlets if you show them how.

They can make meatballs and brown them in olive oil.
They can make cakes and pies from scratch and enjoy doing it.

Know the consequences.

You may think this is time-consuming but you will be helping them live longer, so isn’t it worth it? If children constantly eat unhealthy foods, they could become overweight, or even obese. They could get made fun of at school and suffer emotional impacts. No parent wants to see their child suffer, so teach children to eat right to avoid the consequences.

Set boundaries.

Encourage your child to eat half of their plate or a certain amount of food before leaving the table or getting dessert. Provide plenty of praise and encouragement as they eat.

Try preparing healthy foods different ways.

If he does not like how fruits or vegetables taste, try promising him that, after he eats them, he will receive some of the food he likes too. Or, you can promise him you will let him do things he likes (playing computer, going with him outside for a walk, etc.)

Quick mix sponge cake

Here’s a no fuss, fool proof all in one cake, where the ingredient are quickly mixed together.
The following quantities and baking instructions are for a deep 20cm/8 inch round cake tin or a 20 cm/ 8 inch ring mould.

Ingredients
115g/4oz/1 cup self raising flour
I tablespoon baking powder
115g/4oz/0.5 cup of soft margarine
115g/4oz/0.5 cup of pasta sugar
2 (size 3) eggs

STORING AND FREEZING
The cake can be made up to 2 days in advance, wrapped in clear film or foil and stored in an airtight container. The cake can be frozon for up to three month.

Steps

  • Preheat the oven to 160°C/325°F/gas 3. Grease the round cake tin, line the base with grease proof paper and grease the paper, or grease and flour the round mould.
  • Sift the floud and baking powder into a bowl. Add the margarine, sugar and eggs.
  • Beat with a wooden spoon for two to three minutes, the mixture should be pale in color and slightly glossy
  • Spoon the cake mixture Into the prepared tin and the smooth the surface. Bake for 20-30 min. To test if cooked press the cake lightly in the center. If firm the cake is done, if soft cook for a little longer.

FLAVORINGS
The following amounts are for a 2-egg, single quantity cake as above. Increase the amount proportionally for larger cakes.

  • Chocolate. Fold one table spoon cocoa powder blended 1 tbsp boiling water into the cake mixture.
  • Citrus. fold 2 tsp of finely grated lemon, orange or lime zest into the cake mixture

How to make homemade ketchup

Ketchup is a sauce used as a condiment. Originally, recipes used egg whites, mushrooms, oysters, mussels, or walnuts, among other ingredients, but now the unmodified term usually refers to tomato ketchup.

Here’s how to make homemade ketchup

Prepare the tomatoes

Select 18 lb. of Roma tomatoes or 25 lb. of another variety. Roma tomatoes are a good choice because they have lower water content.

Remove the skin of the tomatoes.

  • Boil water in a stockpot.
  • Add a few tomatoes at a time and cook for about a minute.
  • Dip the tomatoes into a bowl of ice water.
  • Slide the skins off.

Cut the tomatoes in half and squeeze to remove the juice and seeds.

Scoop out any remaining seeds with your fingers.

Set the tomatoes in a strainer to drain any remaining juice.

The more liquid you can remove from the tomatoes the faster the ketchup will reach the desired consistency.

Cook the Tomatoes

Simmer the tomatoes in an uncovered stockpot with the onion, garlic, sugar, salt, cayenne pepper and black pepper. It should take about 30 minutes for them to get mushy

Wrap the celery seed in a 12-inch square piece of cheesecloth and tie it with a twist tie.

Measure 3 cups of apple cider vinegar into a saucepan and set the cheesecloth into it.

Simmer uncovered for 30 minutes.

Pour the cooked tomatoes through a food mill and discard the skin and seeds.

Discard the cheesecloth bag with the celery seed.

Pour the vinegar into the tomato mixture.

Thicken the ketchup in a saucepan over medium heat, stirring regularly.

If you cook it in a slow cooker set on low heat, it will take about 12 hours with the lid off

Can the Ketchup

Pour the homemade ketchup into sanitized canning jars and put the lids and rings on.

Place the jars in a stovetop pressure canner and cover with at least an inch of water. If you don’t have a pressure canner, you can use a regular canner.

Heat for about 30 minutes at low pressure and then remove the jars with a tongs.

Wait for the jars to cool and check that each lid is properly sealed. Push down on the center of the lid and if it doesn’t move or make a sound, it’s properly sealed.

Store or chill the jars of ketchup

How to make homemade peanut butter

Peanut butter is a food paste or spread made from ground dry-roasted peanuts.

It often contains additional ingredients that modify the taste or texture, such as salt, sweeteners, or emulsifiers. Peanut butter is popular in many countries.

Ingredients

  • 2 cups (470 ml) peanuts
  • 1 1⁄2 teaspoons (7 ml) peanut oil or vegetable oil (optional)
  • 1⁄2 teaspoon (2 ml) sugar (optional)
  • 1 1⁄2 teaspoons (7 ml) molasses, honey, or brown sugar (optional)
  • pinch of salt (optional)
  • Makes about 1 1⁄2 cups (350 ml) of peanut butter

Prepare the peanuts.

Before you use your peanuts to make peanut butter, you should rinse them under cool water to get rid of any excess dirt.

You can then pat them dry. If they’re unshelled, then you should shell them by hand, which is a bit easier when they’re dry; they don’t have to be perfectly shelled, either.

Spanish peanuts are a good choice for peanut butter due to the high oil content.

Roast the peanuts (optional).

Some people prefer to roast their peanuts before processing them, to give them that additional crispy, crunchy flavor.

However, this is completely optional and does make the process take quite a bit longer, so it’s up to you to decide whether or not you want to roast them; you can also buy pre-toasted peanuts.

If you do decide to roast them, however, then here is what you’ll need to do:

Place the peanuts in a bowl and lightly toss them with the peanut or vegetable oil.

Preheat your oven to 350°F (176°C).
Spread the peanuts on a single layer on a baking pan. You want to make sure they aren’t on top of each other so they are fairly evenly cooked.
Cook them for about 10 minutes, until they’re lightly covered in oil and are golden brown.

If you’d like, you can gently shake the pan they’re in every 2 minutes or so to take extra precautions against burning.

Pulse your peanuts in a food processor until they are ground.

This should take just a few pulses. For best results, do this while the peanuts are still warm.

Process your peanuts for 1 minute.

The mixture should begin to look more creamy and more like that peanut butter you’ve been craving.

Scrape peanuts down from the food processor bowl into the bottom, as needed, when processing the peanuts. Continue processing the mixture, processing for 1 minute, scraping it off the sides of the processor, and repeating, until it is of your desired consistency. At least 3 minutes of processing should do the trick.

Just remember that this peanut butter will never look as creamy as the kind you may be used to from Jiffy. That’s because it’s more natural. Don’t expect that it will ever look as creamy as it can from the jar—though it will taste more delicious!

Scrape the peanut butter into a bowl when you’re done.

Use a big spoon to do this.

Add salt and sugar to taste if needed.

Taste your peanut butter and see if it needs a bit more salt and sugar. If it tastes the way you like it, then there’s no need to add salt or sugar!

Add small quantities of brown sugar, molasses, or honey, if you prefer a sweeter taste.

You can also substitute molasses or honey for sugar, if you like. Some people prefer to place these ingredients in the processor and to blend them together with the peanuts; it depends on whether or not your processor will be able to handle all of the honey or other ingredients.

If you’re adding these ingredients by hand, then make sure to stir them until they are thoroughly incorporated.

Spoon peanut butter into an airtight container.

Store in the refrigerator for a day or two so it can set in to a lovely peanut butter paste.

Of course, the shelf life of homemade peanut butter is shorter than commercial counterparts, but chances are, your homemade peanut butter will have all been gobbled up even before you get the chance to consider its storage life!
You can store this peanut butter in the fridge for up to a few weeks.

How To Make a Perfect Hard Boiled Eggs at home

How To Make Perfect Hard Boiled Eggs

What’s a perfect hard boiled egg? The whites are firm but not rubbery; the yolks are cooked but still creamy. Here’s how to boil an egg right.

Boiled Eggs
Boiled Eggs

The 4 steps to hard-boiling eggs for breakfast, salads, or Easter eggs.

1) Place eggs in a saucepan or pot and cover with cold water.

Eggs first, then water. Why? Because if you put the eggs in second, they might crack as they fall to the bottom of the pan. It’s no fun to learn this the hard way.

Also, very fresh eggs are delicious fried or scrambled, but older eggs are actually easier to peel. Your best bet for hard-boiled eggs is to choose eggs you’ve had in the refrigerator for a week or two.

2) Put pan over high heat and bring water to a rolling boil.

Remove pan from heat and cover.
You want the water to come just to a boil, but not stay there. Eggs exposed to high heat for a long time go through a chemical reaction that turns the yolks green! So to answer the question “how long should I boil eggs?” The answer is pretty much not at all. And because the eggs don’t really cook in boiling water, some people prefer the term “hard-cooked eggs” to hard-boiled eggs.

Compared to a simmer, here’s what a rolling boil looks like.

3) Let the eggs stand in the hot water for 14-17 minutes.

How long you let the eggs stay in the water depends on how big the eggs are and how hard you want them cooked. To cook small eggs to medium, let them stand for 14 minutes. To cook extra-large eggs to medium, let them stand for 17 minutes. (We’re talking about chicken eggs here. You’re on your own with ostrich eggs.)

4) Drain eggs and put in a bowl filled with ice water.

The ice water isn’t just a nice-to-have; it cools the eggs down and prevents the green yolk problem. If you’re planning to peel the eggs, like if you’re chopping them for egg salad, crack them slightly before putting them in the ice water, and let them sit for an hour for maximum ease of peeling.

Ready to take a closer look? Here’s how to boil eggs, the movie.

Why does this method of hard-boiling eggs work? Because by bringing the eggs just to a boil, you can’t overcook them. You’ll never have to deal with dry, chalky, overcooked eggs with weirdly greenish yolks again. Nothing but beautiful bright yellow yolks and amazing texture for you!

So good you’ll want to eat them with just a sprinkle of salt. Here are some additional recipe ideas for your perfectly hard-boiled eggs:

And here’s a cheat sheet full of tasty tricks for enjoying hard-boiled eggs sliced into soups, layered into sandwiches, blended into salad dressing, paired up with potatoes, and perfectly pickled!

Store any remaining hard-boiled eggs in the refrigerator in a covered container — the lid prevents odors from getting out into the fridge.

But wait, there’s actually one more way to hard-boil eggs. In the oven.

How to Hard Boil Eggs in the Oven
This method is just a bit unorthodox. It requires zero water — which, true, technically makes this method more hard-baking than hard-boiling. But stay with us here. Oven-baked “hard-boiled” eggs are just eggs heated up in a hot, dry oven. It’s a smart move when you’re making loads of eggs or stovetop space is at a premium. Pro Tip: Use a muffin tin to keep the eggs from rolling about in the oven. Here’s the technique in action:

Discover more egg info, including nutrition and safety tips, additional cooking methods, egg recipes, and more — it’s All About Eggs.